Subscribe to my blog

Monday, December 26, 2011

Eight things I am doing to wrap up the last week of this year !

It is the last week of 2011 and the much talked and hyped about 2012 is coming up and today my cook of all people bought the topic up by mentioning how some people were dreading the end of the world. Well I have no idea whether the world is ending or not but here is what I want to do in the last week of this year just to tie up some ends.
    BooksImage by henry… via Flickr
  1. Finishing catching up on the gazillion e-books that I have downloaded over the past year ! Well not exactly that number but I am an e-book junkie! ( Hey don't tell me you aren't tempted, when its just a click away from all you can read!! ) Well most of the books I download are either art or jewellery how-tos or marketing how-to for the same. My favorite and currently reading is Seth Godin's 99 Cows
  2. Cleaning up my computer and backing up the hard disk.This one goes back to #1 once I read all those e-books some I keep for future reference some go on to the recycle bin ( To make room for more e-books of course :) 
  3. Making a list of all the lovely people I met, all the amazing things that happened to me in my career as well as personal life just to add that to my gratitude journal ( Hey I wanna attract more of the same cool stuff !!) By the way my list is definitely going to include all you amazing people that take time out to read what I write, look at my art and leave your thoughts here :) So thank you, you are much appreciated!
  4. Making a plan for my jewellery and art business, yup, yup I know art and business are not words that go together but my goal for this coming year is to get my studio to not just support itself but me as well :)  Now the reason I am putting this out here is ,I want to get some accountability which hopefully will help me to get things pulled together.
  5. Buy tools and metal, colours etc. Well you know how most common resolutions are ' more work done' well, my problem is I do get work done and even have sketches on the ready usually but I tend to go to the studio all brimming with ideas and realize I am out of a particular gauge of wire or metal or enamel colour, so I intend to avoid that starting January.
  6. Reindeer pendant with matched holly earrings
    © 2011 Nayna Studios™
    Copper & Vitreous enamel
  7. Getting my mailing list up dated, I actually have finished with this one (pat on the back :D) and am working on getting my New Year card done on Mail Chimp, this ones for my Jewellery mailers but if you wish you can sign up (its just as fun!)
  8. Figuring out the menu for New Years Eve ! Usually we make some super delicious Indian Style fast food, and voting is still on for this year :D
  9. Coming up with a way to combine my two passions, oil on canvas and metal work! watch this space there is something soooooper exciting coming up and with one New Year's promise to all you sweet folks who continue to drop by and read, although I'll admit I have not been up to speed in posting here lately, and that is to get in one post per week. Do hold me up to it if I do not deliver :P
Well you noticed nowhere have I mentioned New Year's resolutions cause mine usually give up the ghost by march :( So instead I am sticking to daily practices, so what practices are you going to start, do drop a line and let me know, I just might take up your idea as well !

Wishing everybody here a Very Happy New Year and an extremely abundant and bursting with joy kind of year !!  

Enhanced by Zemanta

Sunday, November 20, 2011

The Indian Art Festival- food for the soul !

Installation by ©Kalpana Shah 

Yesterday I spent over three glorious hours at the India Art Festival going on at the Nehru Center Worli, 
Mumbai, and what a treat it was ! Art galleries and artists from a good many different parts of the country had participated and what a huge variety of art there was to see everything from paintings, sculptures, photographs, installations and paper cuttings. 
Individual artists had traveled from as far as Chennai, Delhi & Kolkotta carrying not only their art works but also giving Mumbaikars an opportunity to talk with them and find out more about their art and their processes. Art galleries  had brought along with them not just the contemporary artist's works but also masters such as V. S. Gaitonde & M. F. Hussain ( saw quite a few Hussain originals :) M. V. Dhurandhar, Ara , and some even had prints on sale for that easy on the wallet art craving ! :D
A stall by Studio 3 Mumbai
   The one aspect of the art work that completely took me by surprise was the sheer variety of the media used. There was the good old oil on canvas, water colours, acrylics on canvas, pastels, a stunning portrait of a young girl which was in colour pencil on tinted paper ( I had to read the tag beside the portrait twice before I accepted it was pencil on paper, the rendering was unbelievable) Metal repousse, etchings on paper ( oh there were some enterprising students from Sir J.J. School of art making etching prints on paper on the spot as per client request ! ) Paper cuts made using the intricate Kirie technique from Japan and some beautiful Tanjore paintings by Mrs. Swarna Raja  a Bengaluru based artist who uses organic as well as inorganic colours on a specially treated lime washed surface to create her work.
The high point for me surely was the installation by artist Jitish Kallat which was a larger than life kerosene stove completed covered every square inch of it in animals taken as is from the very famous friezes found on the walls and facade of the Chatrapati Shivaji Terminus ( C.S.T.) formerly known as The Victoria Terminus. Every available space on the stove is covered with these animals and floral motifs found on C.S.T. friezes.The concept being just as animals survive by devouring each other we city dwelling folk too have a similar way of surviving off of each other ( well perhaps a little macabre but hey its true I think !)
Add caption

Detail of the kerosene stove installation,
featuring a monkey
 For those from the younger generations a kerosene stove was quite prominently used in most kitchens in Mumbai prior to the arrival of gas and electricity, I have some fond memories of the comforting sound these made as they cooked the daily meal :)  
Installation By Valay Shende
 By Kalpana Shah
It was truly a fun though tiring afternoon spent at the Indian Art Festival, and although I am sad that I could not listen to any of the ongoing lecture and talk series by prominent art experts, and artists, hopefully I can do so at the next year's event.

Friday, November 18, 2011

Flowers on the road

A few years ago back when I decided to quit all the crazy designing and teaching jobs I was into -not that they weren't fun but I realized I was not really doing what I was most passionate about and simply had to get back to my easel,in this case my  furnace. I started experimenting with enamels on steel  & copper panels, with liquid and vitreous enamels. Mostly I was into wet packing a technique where you meticulously pack the enamel that has been moistened with water with the help of s small round brush. but I also experimented with liquid enamels and mostly just tried to get an even coat of the colour ( tough on a newbie these liquid enamels! ) rather than too many textures with them. Recently going through a drawer full of old and unfinished metal pieces I found a whole stack of these and thought I could use them or at any rate finish them so here are the first three in the series. They do not have a common theme running through because to begin with these were just experiments so here they are . I would like to hear ideas on how best to use them. I have a few ideas one was to have them made into box lids, I have some cute pinewood boxes and sell them or gift them. The other idea was by a friend who suggested I use them to create a larger panel which could be turned into a wall clock. Any other ideas ? Would love to hear them do drop a line. :)
One Tree, Enamel on Steel
© 2011 Nayna Shriyan

Flowers on the road, Enamel on Steel
© 2011 Nayna Shriyan

Gulmohar, Enamel on Steel
© 2011 Nayna Shriyan

Wednesday, November 9, 2011

Arow heads fit for cupid!

Arrow heads for my quiver full of arrows sculpture
Will these arrow heads work for Cupid? My arrow heads finally done! Well not complete but here is their look, what do you think? These are the arrow heads and the shafts are going copper pipe with a very interesting joining technique , that I will be posting in detail later on. The body of the quiver too is in its final stages watch this space ( feeling like a tabloid here :P )

Wednesday, September 14, 2011

Meet Moru and his friends -a journey into WilderIndia

© WilderIndia
Spot Drawing © Nayna Shriyan
          Join me today as we meet Moru's friends and family :) Creating the characters of the story is generally done solely by the writer, so also with these stories, but the fun for me was to put to paper Sharmila's ideas with regards to their appearances, putting down particular features and aspects to each character that not only made them stand out but also meant that each character's personality was immediately evident. Moru himself had a very prominent feature in that his tail had to be very different from the rest of the peacocks, (okay so I am going to let you get a peek at the cat, not let the cat get out of the proverbial bag completely !!) see Moru is quite shy and keeps his tail shut or rather believes that he simply isn't coordinated enough to be graceful and thus never opens his tail feathers, and that's why his tail had to be shown a little stunted.
        The royal family consisted of the King and Queen of peacocks and their look was kept simple but elegant with rich feather colours and the Queen had an adornment of white feather pattern on her body. While creating the individual looks we thought about adding extra elements like a pearl necklace on the Queen and en eye patch on one of the village elders but realized that made the story to gimmicky so instead, one of the evil elders just got a single eye with one permanently shut! One of the judges was fat and short, another one had a crooked neck !
Moru at his 'damce' competition
© 2011WilderIndia, illustration © Nayna Shriyan
Painting on silk.


      In this image you can see the villagers on the top and bottom tiers with the evil elders on the right and oh by the way that tree stump is their round table ! what do you think of that? :)
       In the center is the princess from a neighboring clan with our hero trying to dance (but falling flat on his beak !!) . Creating this princess was the most fun, she got long shapely talons nice drop shaped feather patterns and a long graceful beak, long lashes and an orchid to add to her charm, gorgeous isn't she?
With all the excitement about the characters in progress we also wanted to stay true to the style of Pattachitra with their traditional layouts. So we had a different layout for each page that we designed and naturally each one has its own unique border. Or borders got their very own animal so while this one had lady bugs, one had leopards while  another one got deers, do look out for each animal as you read the book! An extra treat are the smaller animals featuring on each page, small birds, insects and animals in one instance a surprised frog jumping out of the way ( of who else but our clumsy hero !) Do find out how Moru finally learns to dance :)

Sunday, September 11, 2011

Continuing the Quiver saga........


Continuing the quiver saga...

Currently I am completely taken in with the arrows and their designs, keeping in mind that these arrows are not meant to hurt but meant for the viewers to fall in love with them, I decided that they had to be of different shapes and have bright colours. Here they are cut and ready to be enameled and with the first coat of transparent flux fired and the cloisonne wire  . I will be revealing the finished pieces complete with all the wires and enamels in place as I want the final design to be a surprise! Of course the quiver itself is not being ignored, here it is with one coat of flux and the armature that will be holding it upright Although I will admit not too much of the electro-forming has stayed in place, I have faith that I can attach it by way of embedding it with the flux. for now this is where we are all fluxed up !!


Enhanced by Zemanta

Tuesday, September 6, 2011

Continuing the journey through WilderIndia!!

The second little cutie pie in the book (WilderIndia)  is 'Moru' as you may have guessed Moru is a peacock!! (Mor means peacock in Hindi and Marathi ) A prince at that! now while I do not intend to give out the story here, I will let on this much, the story is quite action packed! Well I think I am done with the exclamation marks :) !!!
© 2011 WilderIndia
Illustration © Nayna Shriyan

            Before we go on to the amazing characters in this story and the fun we had visualizing and creating each of them, I want to tell you about the unique medium we used. Moru happens to be not just the national bird of my country (India) but also the state bird of the north-eastern state of Orissa and in keeping with the theme of the book, the art style we used is Pattachitra .
             Traditionally this art form is practiced in Orissa , with the themes centering around the religious tales of the Ramayana and the Mahabharata as well as the Dashavatara painted in painstaking detail on specially treated surfaces with vegetable dyes. The surface to be painted upon is firstly prepared by sandwiching layers of cotton cloth (usually old sarees) with an organic glue, which is followed by sun-drying and then hours of hand polishing the hardened sari layers with a smooth stone! After the surface is prepared comes the turn of the colours which are either mineral colours or derieved from processing vegetables ( a good example is their red which is obtained from boiling certain seeds). These colours are then hand mixed ( read index finger till your bone aches!), till the correct consistency is achieved! Now aren't you glad you get to use pre- mixed colours from your favorite art stores  :D (Guess the exclamations are back ! )
           The one fun fact I really want to share here is their brush, this one is actually hand crafted from a mouse hair !! Yup you read that right a mouse is caught and his fur is harvested to bunch together into a brush ! ( Hopefully the mouse is free to scamper away afterwards ) This comes in specially handy while painting in the finer details like lines of hair and minute designs as the mouse hair is quite stiff and can work out the details beautifully!
 While we did not go into as much detailing we did order some authentic Tussar silk from a Pattachitra artist all the way from Orissa and mounted that prior to painting it with silk colours! As you can see from the image the uneven texture of the silk makes for a great backdrop.
Well you just read about some unusual art materials, if you know of any more such do drop a line, I am always interested to learn more about folk art , in the next post I will let you in on some inside details about the characters in the story, stay tuned :)

Friday, August 26, 2011

A quiver fit for cupid- a metal and enamel story.

Close up of electro-forming
Have been concentrating on my jewellery for a long time now, and had put all of my painting and metalwork on hold. Having managed to create a goodish stock of jewellery I figured I could reward myself with a little bit of sculpture yay!! So the project I am working on is 'Quiver of arrows' An enameled quiver filled with enameled arrows. But its not all enamel there is a good amount of metalwork involved as well, along with the shaping, forming and soldering one of the techniques I am going to use is electro-forming.
The two sides of my quiver with
electro-forming on the top half
In short electro-forming is a process similar to electro-plating  where metal is plated or added upon another metal surface but in electro-forming metal is selectively added rather piled onto just specific areas to create textural effect. Here you can see the two halves of the quiver, these will be joined together by a column of rings on the sides around a copper armature. On the top half of the quiver is going to be a surprise element any guesses ?? Will keep posting updates as they develop, for now I am going with a cool colour scheme for the enamels but its an idea in progress, do check back :)
Enhanced by Zemanta

Wednesday, August 24, 2011

WilderIndia-book release

© WilderIndia 2011
Yippee the book is finally out! and you can check it out in all these stores online
Fipkart, Uread., and Indian Gifts Portal
Three fantastic stories are in here you have all met Shekroo here on my blog and I will soon be introducing Moru the peacock and Krishna Jinka the black-buck here! Meanwhile anybody want to get a jump on their reading, check out the book at the above links :) Happy reading!
Enhanced by Zemanta

Wednesday, July 13, 2011

Four tips to give your creative cogs a refreshing break.

            Recently I have been in what can only be described as a 'Creative Rut' now I did not come up with the term on my own but thought it fit aptly! Saw this term on a blog post by Lori McNee on her blog Fine Art Tips. I did find all her ideas to be very helpful but then I realized that I needed to find something that worked for me, and this is what I came up with:-

  • A day off from the studio - instead spend a day at an art library.( a great way to get those cranial cogs working)
  • Catch up on updating, blogs, websites, FB fan pages and send emails ( I know I know, supposed to be a break, but remember there is nothing related to art making involved :D )
  • Take up one hobby that has nothing to do with art ( ok all those guilty of experimenting with different media and calling it a hobby raise hands here !! ) P.S. I have decided to set up my own terrarium and vertical gardening as mine :)
  • Take up a fitness regimen ( fit body, fit mind and all that ! )

So these are my tips that I intend to stick to this week how about you guys, any body face the same problems?Any tips that you would like to share? You know the drill, just drop a line :)

Thursday, June 30, 2011

Come down a warli path!

       Welcome to the world of warli, a world in which everything is magically transformed as if into a magical land in a child's vibrant imagination, where people have two triangles for bodies and sticks for arms and legs and houses have seemingly simple thatched roofs!!
        At first glance, the simple drawings of a warli painting appear to be a child's work, but on further inspection, we realize the complex thoughts behind such a simple art form. Warli is essentially what is called a 'tribal' art form, developed over the years by the simple village folks of the state of Maharahstra, to express their thoughts and feelings about their surroundings, their day to day life, festivals and events. Slowly though over a period of generations, the work has come to encompass those objects that perhaps are not really a part of a simple villager's life, but rather a view of the modern life, through a much clearer, point of view.
Most of the villages in the state of Maharashtra have a few 'warli' artists, these artists learn the art of painting these intricate and detailed paintings not in a school, but rather the old fashioned way, sitting by their father's side and observing him draw and paint complex pieces.Traditionally these pieces are not painted on paper or cloth but rather on the walls of the villager's homes, depicting various events, weddings, festivals, village dances, temple processions, harvest and other farming scenes.
        A warli painting has the most humble beginnings imaginable, the artist first prepares the surface to be painted upon by smoothening and plastering the wall with a paste of cow dung, once dry, naturally occurring white clay or calcium is used to draw out the figures, animals, trees, temples and houses. This is the reason why most warli paintings appear as white on brown combinations.  Today as the art form has been popularized so much, it is not rare to find other combinations, but not with too many variations, as these  are the colours that are easily identified with the original tribal art form.

© Wilder India , Illustration - Nayna Shriyan
Temple  Scene 'Shekhroo'
        In creating the book, 'Shekhroo' we wanted to keep the original look and feel of warli, so while we didn't actually use cow dung, and white clay! we did use a rough paper and painted it with a thick coat of poster colour, simulating the slightly coarse look . The figures, background imagery, and supporting cast of animals were all painted in a stark white, while the main staring hero, 'Shekhroo was painted in his original colours of a dark shade of maroon and gold!
         Here he is in his favorite tree waiting by the temple, to know why you will have to read the story!!

Friday, June 24, 2011

WilderIndia- A journey through the animal world of India!

        About two years ago, I saw an post on a yahoo group that I am a member of, for a requirement of an illustration artist to work on some children's books. Now those of you who are regular readers here, will know that I am not an illustration artist and my media are oil paints and of course my beloved metal work, so I would be the last person to be considered for the job. But it sounded like an interesting idea especially since working with children is something that I truly love so I decided why not? So, I emailed the person and boy am I glad I did!

©'Wild States of India'  Pic ©Sinu Kumar
'Sekhroo' ( The Great Indian Malabar Squirrel)

        Sharmila the lady behind 'WilderIndia' was just starting out with her innovative concept of writing original stories with specially created characters based on the state animal from each of the28 states of India. We fixed up an appointment and met up and she told me she wanted me to work with her character 'Shekhroo' which happened to be the state animal of 'Maharashtra' .

         Now Shekhroo or The Great Indian Malabar Squirrel is no ordinary squirrel, I was astounded when I realized that these particular squirrels grow to a gigantic 3 feet!! (well gigantic for a squirrel at the very least!)
         Stunningly beautiful creatures that have a really long tail (which actually makes up most of the three feet length) and two tone fur, their dorsal bodies range from a deep maroon to a dark brown tone with and underbelly of light tan going to a deep gold. These adorable creatures call the 'Sahyadri' range of hills in the state of Maharashtra their home, residing on the tall trees in the forest surrounding the 'Bhimashankar' temple. Highly elusive, most often the only proof of their presence is sight of their messy 'ball of twigs' nest high up in the trees.
In the coming posts I shall be talking about the unique style in which I did the illustrations. Unique because, not only are the characters based on the state, but each book is illustrated in a different style and the set that I worked on has a folk art style unique to that particular state!
So read on in my next post I will be talking of the style of tribal painting called 'Warli' where the people and animals have a really special look !! Stay tuned!

Enhanced by Zemanta

Thursday, June 9, 2011

My smallest painting yet!!

Miniature painting of Ganesha -Oil on canvas, silver foil, faux gem stones
© 2011 '5.75 x 4.25' inches Nayna Shriyan

           This painting has me going to flash back mode, back to the summer of 2002, right after the final examinations of my final year at Art school. I was dead tired, after the truckload of submissions consisting of a full year's portfolio, supporting metal work, dissertation (which I suspect weighed more than I did at the time ! ) another dissertation on the techniques of metalworking that I had learned in all the four years specializing in metal work. Not to mention the viva (you know where you are faced by all your professors and asked whether you truly believe in what you have slogged for a whole year!) All I was looking forward to was a trip to my native home in Mangalore to the southern part of my country, lush greenery, mangoes, cousins to hang out with and a month long break, but my dad had other plans!  He came home very excited, about how he had discovered a miniature painting workshop in town (by this I mean the city of Mumbai, hee hee, we Mumbaities call the big city town!!) and that he had enrolled me in it! Here I was looking to put my feet up and take it easy, and my dad had a week long workshop planned which meant a two hour train commute again (did I mention, that's exactly how long it for me to and fro home to college!)  
         Well so there I was trudging back the same way, but I was in for a pleasant surprise, as part of the technique for miniature painting was the application of fine gold foil onto the painting surface, a painstaking process involving varnishing the intended area and then allowing the coat of varnish to dry to just the right degree and then gently placing the foil with a brush.
          Recently when I was asked by a client to create a custom gift for some very important people and she said that the piece needed to have a very rich look, I immediately thought of miniature painting. with the rich foil, and faux gem stones. Now my client already had a very intricate silver frame so we decided to substitute silver foil for gold and this Ganesha is the result .
          While in true miniature painting tradition the dimensions of the piece is 5.75 x 4.25 inches the colours themselves are oil on canvas instead of the usual water based colours.Traditionally a mineral based compound is used to give a slight relief to the areas that are gilded, instead, I used texturing white. After applying texturing white to the crown, dhoti and ornaments including the decorations on the two sides, the Ganesha was painted in oils, and boy am I still regretting it!! In order to get a really fine outline, I ended up adding too much linseed oil. So despite having been completed for more than a week now the background black is still wet!
Ganesh painting complete with the silver frame
         The silver foil came next and lastly the faux stones, but the painting truly looked complete once my Ganesha was placed happily into the beautiful silver frame!
Isn't it perfect, almost like the person who designed and created the frame had this very image in mind.

What do you think, should I have stuck to gold or the silver is truly the way to go?

Friday, May 27, 2011

Finishing off!!

           Now that you know how to cut, pierce, raise, shape  and etch metal , its time to graduate!! :) Time to complete you metal art work, by giving it some really interesting 'finishes' . What are 'finishes' in metalwork , well finish simply refers to the final look of the piece, whether left off with the original warm red of the copper or given and aged look or coloured. Here are some of the more commonly used finishes or effects to make any artwork look interesting.
          Copper which is usually the preferred metal for most techniques, also happens to tarnish quite easily, especially so if you live in a city like Mumbai, ( humid and high levels of air pollution).
So in order to protect you pieces and make them more attractive, you can add certain finishes.
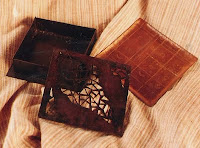
Copper box and dish with antiqued and lacquered finish
©1998 Nayna Shriyan
  • Lacquer or Varnish: If you are like me and love the warm red colour of copper then a clear coat of varnish is all you need to do in order to protect your artwork.  Lacquer can either be sprayed on or brushed on depending upon the variety used.  I personally prefer the spray on kind that you get in cans, making for a smoother and even coat.The dish shown here on the right is a clear copper effect with lacquer sprayed on.
  • Antiqued: If a more aged , antique look is what you are after then, aging the copper is easy with some liver of Sulfur commonly called 'Oxidizing salt' . Generally if the salt is fresh all you need to do is mix a small lump with some water and dip your piece once or twice very quickly, brush with a brass wire brush and rinse (never ever leave your copper sitting in the solution even for a minute!)  The box in the picture above is a perfect example of the antiqued effect, it is a very old piece, in fact one of my very first assignments in college!
  • Pendant with irregular blue green patina on copper
    ©02010 Nayna Shriyan
  • Patina:  Patina is essentially colour that is bought about chemically upon a metal surface with the use of certain chemicals and under very particular conditions. Technically speaking it is a protective layer formed on the surface of the metal due to atmospheric conditions. There are a range of colours that can be achieved with the right chemicals, from a vibrant blue to a dull rust brown, from green to a blood red, textured straw yellows to black. The simplest of greens can be achieved by applying any acidic substance like lemon juice to a clean piece of metal and then leaving it out for a few hours, you might need to repeat the application and then keep rinsing in between applications. After you have obtained the colour you desire, the piece absolutely has to be waxed in order to be protected. The atmosphere continues to change the colour until most simply turn into a very dull black
So this is the concluding part of the series on metal work and the common terminology used by metalworking artists. By no means a complete list, but still enough so that it does not seem like complete gobble de gook!!
So do drop a line if you liked this series and if you have any thoughts regarding another series I could run like this :)


    Tuesday, May 17, 2011

    My Studio Mascot

    My Studio Mascot
             I just had to share my studio mascot with all of you, this sketching mannequin came to me in November last year to help out a student in her sketching skills. While she left my art class and I have not had much luck persuading the rest of my students to take advantage of its presence and maybe enhance their sketching skills :( they do make it a point to have the mannequin pose a different way each time !!
             This mannequin also happens to be my sole companion when I am alone in my studio creating, and so I am thinking of giving a name. Now since I do not think I want to decide on the gender , I hope someone can come up with a unisex name, any ideas ?? Do drop a line :)

    Saturday, May 14, 2011

    More Metal Madness!

                Continuing the definitions , I thought I could move on to the heavy weights, those techniques that take up longer to learn and even longer to perfect.
      Chaised bowl, Copper
      © 2010 Nayna Shriyan

    • Chaising: While this might sound like chasing a piece of metal with a hammer , it means working on only one side of the piece of metal with tools and a hammer (a special one). Mostly the tool used is a simple one which can create lines, so the design appears to be like line art. Although in the bowl to the right there is some relief seen this happens mostly due to the pressure applied on the tool and due to the copper been annealed to extreme softness.
    • Repoused necklace centerpiece, Copper
      © 2010 Nayna Shriyan
    • Repousse: A french term meaning to work on both the sides. Basically this involves giving relief from one side and giving the finer details from the other side( usually the side to be perceived as the top or the front). This can involve many different steps, from using wooden mallets to special tools called stakes to setting the metal in pitch ( a mixture of tar, plaster of paris and a few other things). This process may take up to a week or more depending upon the size and the detailing required.
    • Raising: Similar to a potter using his wheel to raise up a bowl or pot, this process involves
      Raised Copper vessel with tinning,'5 x 5 x 2' inches
      Copper and tin, Red patina
      © 2000 Nayna Shriyan
      raising bowls and other similar vessels using special stakes( tools) and hammers. A very delicate process, that can easily go wrong if you do not know what you are doing! There are absolutely no joints in the vessel, my first raised bowl featured here received some intense scrutiny by my non-metalworking friends for some joint somewhere, it was so much fun to look at their faces when they finally conceded defeat still insisting that there had to be a joint somewhere !
    • Fold Forming: A very interesting process that involves folding the metal to create creases and them opening it again. The crease adds to the visual and textural effect.A process that I am still trying to perfect and my final efforts will soon be feature here ! Keep checking back :)

    Monday, May 9, 2011

    The war path!- A book review of " the WAR of ART

    Cover of "The War of Art: Break Through t...Cover via Amazon
            Recently on the recommendation of a creativity coach, whom I follow and will hopefully soon by hiring (these folks can work wonders for you!!) I read a book called ' the WAR of ART ' by Steven Pressfield. While I love reading books like these, 'motivational' books (to me these books not only motivate but also pass along some serious information) I suppose they are called, most kind of go the round about way getting to the point, but not this one. Mr. Pressfield goes straight to the point right from the word go!

              As artists there is always a certain amount of anxiety related to actually doing the work, sitting down to write, paint, sculpt or create in any manner cause a whole list of obstacles to suddenly land on our paths. More often than not we treat distractions or interruptions rationally, like falling sick ! I know falling sick is out of our hands, but believe me read the book and you will know what I am talking about. The book lists all those small and big interruptions, distractions even some things on your to-do list that will surprise you. The best part is there are also points on how to tackle all these problems.

              Two things I got out of this book is A) what keeps me from working and B) What helps me to stay working.
    Frankly the book is not meant just for artists but for any body who ever wanted to achieve something but got derailed will finally have a name for the precise thing that cause the derailment. Mr. Pressfield calls it 'Reistance' !If any of you have read the book or any book like this that tells it straight, I would love to hear from you, what do you think, did the book help? are you spending more time doing the work you should be? could be anything, writing, sticking to that gym time, dieting, reading, painting, or like me marketing  my art (that's the thing that brings out my green eyed 'Resistance' monster)!!

    Okay I know book reviews are supposed to enlist the negative points as well, my only grouse, I wish the book were bigger ( more pages) I need some more in your face war tactics against 'Resistance" :)


    P.S. : The above link is not an affiliate link, just something for those interested to check out, again I do not make money of off any links that I may put up here .

    Enhanced by Zemanta

    Monday, April 25, 2011

    Continuing on the metal mania !

             This one is for all my readers( or is it peeps now? :)  who put up with me randomly using metal working terminology like piercing , acid etched, raised and patina. I thought I ought to put up at least a basic description, so here goes;
    Pierced copper on a brass base
    © 2011 Nayna Shriyan

    • Texturing: while a common enough term for any creative people that work with the visual arts, in metal working, texturing is not as easy as it often requires, special hammers and tools. (The most basic of texture, like stripling( tiny dots ) requires the use of a pointed tool and a hammer and the
      Hammered texture on Brass
      © 2011 Nayna Shriyan
      ability to hammer away like a woodpecker! Some are more complex requiring special punches ( tools with textures engraved on them) some require putting your sheet metal through a rolling mill (a machine with textured metal rolls ) .
    • Pierced:  This refers to any design that has been cut out of a sheet of metal without disturbing the edges of the sheet. It involves drilling a hole at the required spot, then threading the fine saw of a piercing saw( a special saw that has thin blades that can be attached and detached at both ends as required) through the hole and sawing out the portion of metal that needs to be cut out.


    • Acid Etched: Acids such as nitric acid in the right concentration can be quite corrosive, using this fact to advantage designs can be etched onto sheet metal. Basically it involves protecting areas of your design that you intend to keep intact with a acid resisting paint ( sometimes referred to as resist) this can be wax, or plastic tape or a specialized paint meant for this purpose, then immersing the sheet into a tub of acid solution. The acid eats away at the sheet metal and leaves a clear defined design.
      Acid etched copper
      © 2010 Nayna Shriyan

    • Annealing: Probably a technique that precedes  any metal working activity and takes the least amount of time. This involves heating the metal sheet to a dull red and then cooling it. Some people like to quench the metal in water immediately ( dip the metal into water). This softens the metal and not only does it make the metal easier to work with but also avoids accidental tearing of the sheet.
    So now you know of at least some of the mumbo-jumbo I keep talking about, I will be posting about more terminology soon! So what do you would I make a good teacher, does the explanation make any sense, do leave you comments folks , would appreciate the feedback! :)

    Enhanced by Zemanta

    Friday, April 15, 2011

    A bottle with a view series -2

    Glass bottle series, '16 x14' inches Oil on canvas© 2011 Nayna Shriyan

                My second painting in this series features two new entrants!! Two very vibrant coloured bottles. The warm reds and oranges reflected by these two simply captivated me. As I proceeded into the painting I soon realized that not only were there reds, oranges , yellows and browns but also blue at a point of time in the amber bottles! The one thing I have begun to notice is that still life objects need just as much a minute treatment as any portrait subject would!
    So here is a question for all you folks out there that work in oils, does the work look completely flat as you are working it ( you know your face about 3 inches from the canvas and your field of vision only about 5 square inches :D )  and then when you step back to inspect your work you actually realize that the object of your focus is actually beginning to get depth and perspective?? I know I do, so what about it folks??

    Wednesday, April 6, 2011

    A bottle with a view series 1

    © 2011 Nayna Shriyan
              For a while now I had been looking for a subject that would allow me to not only paint a series but also to expand my working knowledge of oil paintings. If you know me or have been reading this blog for anytime now you would know that while I am a trained metal artist, oil painting is like a secondary passion that; well seems to always be fighting with my first passion enamels and metalwork!
    Glass bottle series 1 ,"14 x 16" inches Oil on canvas
    © 2011 Nayna Shriyan
             Recently just as we were about to pack off some glass bottles for recycling I was struck by the beautiful colours of the bottles. The colorless ones seemed to pick up all  the colour from their vicinity and the coloured ones seemed to throw up a huge array of shades, tints and tones with the right light falling on them.
    So I picked up my trusty SLR and along with some gentle morning sunlight, it was soon a riot of colours! Before I knew what was happening there were some 20 shots of coloured bottles and their vibrant reflections on the floor !!

             This is the first in the series, I wanted to try out a simple single bottle arrangement and also simplified the background as you can see from the photograph above.While I was working on this painting the one thing that struck me was that painting an object this closely was as good as working on a portrait, the entire time I was using a tiny No. 000 brush and working the minute changes in the colours and shades. One of my students even went so far as to say, 'there aren't so many colours you are imagining them !!'
    What do you think, did I manage to do justice to the above picture? Should I have kept the original background, neighbors house and all ? :D

    Friday, April 1, 2011

    My favourite medium in the world - Metal !! lots of it !!!

    I was recently asked by someone as to my first choice of metal for my art work. I have used quite a few different kinds of metals and prefer to use the metals as per the kind of mural, sculpture or panel in question.  Each metal allows for unique textures and effects and helps in bringing about the character of the artwork.Today I would like to start with three of my favorites.

                 Copper:  My most frequently used and by far my favorite metal remains copper. The warm red colour of copper has always been a point of inspiration for creating repoussed work. Having used copper since my art college days, I find it to be the most versatile of metals, enabling me to shape it, cut it or colour it as per my design needs.
    Butterfly, cloissone and wet packed enamel on pierced and electro-formed copper ' 20 x 15' cms
    © 2009 Nayna Shriyan


     Here in our local metal market , copper is available in two qualities, a semi-soft  and a dead soft variety. The soft offers absolutely no rebound and is perfect for creating high relief objects such as masks and raised bowls. The semi-soft variety works perfectly for perforated and etched designs.
    Copper also offers additional advantage in its ability to take on colours by way of patina ( surface colours achieved by copper reacting with chemicals) and also in that it can be enameled.  Copper also naturally has a kind of antique look to it which can be further enhanced by using oxidizing salts to give an aged patina .The one quality of copper , that creates some trouble for the final finish, is the ease with which it can react with atmospheric air, to oxidize and change its colour, if not protected quickly by a varnish or lacquer. Of course my favorite amazing quality of copper? It can be enameled!!

               Brass: Brass has a unique ability to appear rich and golden when polished and a uniquely antique look when oxidized. It natural hardness lends itself perfectly for perforated designs as well as acid etched low relief textural effects. Although soldering brass- brass or brass -copper can create some trouble, brazing the pieces together does solve the problem.
    While brass does react with certain chemicals to create patinas, it cannot be easily enameled, due to the low melting point of the zinc contained within it.
    Swordfish paper cutter, '6 x 1.5' inches Pierced Brass
    © 2000 Nayna Shriyan
     Although thin brass wires skillfully used can give a beautiful effect in cloissone` enameling.

               Nickel Silver: This is one metal that has always  fascinated me. The slightly yellowed silver colour always reminds me of fine silver that has oxidized just a bit.Although quite hard to form or repousse it is perfect for cut and perforated designs, although while using you will have to keep one thing in mind it has a slight rebound, what this means is that when you hit it with a hammer, the hammer bounces back just a little bit! So do be careful or you just mind end up hitting yourself on the nose on the rebound !! Have you experienced this? If so how do you deal with this issue?

    If you are a metal artist like me what is your favorite metal, any of these? or do you like some other really unique metal and what are your reasons? If you are not a metal artist, I would still love to hear which metal 'speaks' to you and why? 

    Monday, March 28, 2011

    Mermaid in glass -2

            Here she is all fired and ready! Having decided to change her skin colour to a more suitable colour, she took one last extra run in the furnace, before she was complete. I decided to frame her using a completely contrasting medium, paper! I had a shape cut out of 8mm MDF wood and created the framing for her out of paper mache pulp in the shape of seaweeds and shells, in order to make the mermaid feel more at home I also painted the base wood a beautiful bright sea green, along with a few waves!
           Yesterday she traveled to her new home, and was received with much joy (actually this beautiful wide grin that my niece reserves for something she really loves!! ) She will be gracing the walls in my niece's room after it gets a new coat of  paint( hey she is a princess after all! )