Subscribe to my blog

Showing posts with label Metal work. Show all posts

Tuesday, August 26, 2014

Repurposing Repousse !


Having taken to making jewellery , this side of my art seems to be continually in ignore mode, :( sadly so. Well not making apologies or excuses rather here is what I have been doing. I recently took up my pitch pot and realized the pitch had gone brittle again! well, after having gone back and forth about making new pitch or maybe buying some red or green pitch from abroad, I finally decided all the pitch really needed was a good dose of coconut oil and some reheating. So on to my gas stove went my bowl and after about an hours worth of low heat ( never ever let your pitch overflow onto your gas range, its murder to get out !!!) Here is the bowl after a good couple of hours and all the little pimples you see is because of the air escaping after all the boiling . I wish I had gotten an image of the pitch boiling it looked like a witch's cauldron ( boil and bubble!! :D)  


So what is the all this pitch hullabaloo about? well its a new project that is completely repousse`
The first stage with the shape outlined and basic relief work

Out of the pitch with some of the detailing done

Finished Rams with hollow pipe rings through the smaller ring in the nose

Thursday, October 18, 2012

A portrait with a reverence-Shivaji Maharaj

Shivaji Maharaj
© 2012 Nayna Shriyan
Copper sheet, copper wire, Black Acrylic

    A true first for me, a portrait done in metal !! Yay! Now you might be wondering what am I getting so excited about well, this image here is a likeness of Shivaji Maharaj. For all my fellow Indians, you know who I am speaking about and why I am getting so excited, for all my global friends, this is the portrait of a great leader of our country. Without going into too many details, he  was an iconic leader who united the state of Maharashtra and brought the people together by instilling courage and patriotism in them. Someone who was just barely 16 and lead from the front. Tough he lived and ruled a couple of hundred years ago, his philosophies and ideologies are just as relevant today as they were then. For this very reason, I got a little jittery when a client asked me to create something with Shivaji Maharaj ( incidentally Maharaj means King ) as I absolutely did not want to mess this up!.
        So I gave the old cogs a good run and came up with this idea, I used piercing as my main technique to cut out portions of the profile and used line tool to bring out some details. The details on his garment are mostly fine copper wires soldered. The backing is a 4mm thick black acrylic sheet. Some stripling adds to the texture in the background. The bonus of course was the client and the person who received this piece as gift falling in love with it! :)

Enhanced by Zemanta

Friday, May 27, 2011

Finishing off!!

           Now that you know how to cut, pierce, raise, shape  and etch metal , its time to graduate!! :) Time to complete you metal art work, by giving it some really interesting 'finishes' . What are 'finishes' in metalwork , well finish simply refers to the final look of the piece, whether left off with the original warm red of the copper or given and aged look or coloured. Here are some of the more commonly used finishes or effects to make any artwork look interesting.
          Copper which is usually the preferred metal for most techniques, also happens to tarnish quite easily, especially so if you live in a city like Mumbai, ( humid and high levels of air pollution).
So in order to protect you pieces and make them more attractive, you can add certain finishes.
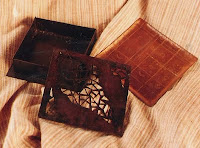
Copper box and dish with antiqued and lacquered finish
©1998 Nayna Shriyan
  • Lacquer or Varnish: If you are like me and love the warm red colour of copper then a clear coat of varnish is all you need to do in order to protect your artwork.  Lacquer can either be sprayed on or brushed on depending upon the variety used.  I personally prefer the spray on kind that you get in cans, making for a smoother and even coat.The dish shown here on the right is a clear copper effect with lacquer sprayed on.
  • Antiqued: If a more aged , antique look is what you are after then, aging the copper is easy with some liver of Sulfur commonly called 'Oxidizing salt' . Generally if the salt is fresh all you need to do is mix a small lump with some water and dip your piece once or twice very quickly, brush with a brass wire brush and rinse (never ever leave your copper sitting in the solution even for a minute!)  The box in the picture above is a perfect example of the antiqued effect, it is a very old piece, in fact one of my very first assignments in college!
  • Pendant with irregular blue green patina on copper
    ©02010 Nayna Shriyan
  • Patina:  Patina is essentially colour that is bought about chemically upon a metal surface with the use of certain chemicals and under very particular conditions. Technically speaking it is a protective layer formed on the surface of the metal due to atmospheric conditions. There are a range of colours that can be achieved with the right chemicals, from a vibrant blue to a dull rust brown, from green to a blood red, textured straw yellows to black. The simplest of greens can be achieved by applying any acidic substance like lemon juice to a clean piece of metal and then leaving it out for a few hours, you might need to repeat the application and then keep rinsing in between applications. After you have obtained the colour you desire, the piece absolutely has to be waxed in order to be protected. The atmosphere continues to change the colour until most simply turn into a very dull black
So this is the concluding part of the series on metal work and the common terminology used by metalworking artists. By no means a complete list, but still enough so that it does not seem like complete gobble de gook!!
So do drop a line if you liked this series and if you have any thoughts regarding another series I could run like this :)


    Saturday, May 14, 2011

    More Metal Madness!

                Continuing the definitions , I thought I could move on to the heavy weights, those techniques that take up longer to learn and even longer to perfect.
      Chaised bowl, Copper
      © 2010 Nayna Shriyan

    • Chaising: While this might sound like chasing a piece of metal with a hammer , it means working on only one side of the piece of metal with tools and a hammer (a special one). Mostly the tool used is a simple one which can create lines, so the design appears to be like line art. Although in the bowl to the right there is some relief seen this happens mostly due to the pressure applied on the tool and due to the copper been annealed to extreme softness.
    • Repoused necklace centerpiece, Copper
      © 2010 Nayna Shriyan
    • Repousse: A french term meaning to work on both the sides. Basically this involves giving relief from one side and giving the finer details from the other side( usually the side to be perceived as the top or the front). This can involve many different steps, from using wooden mallets to special tools called stakes to setting the metal in pitch ( a mixture of tar, plaster of paris and a few other things). This process may take up to a week or more depending upon the size and the detailing required.
    • Raising: Similar to a potter using his wheel to raise up a bowl or pot, this process involves
      Raised Copper vessel with tinning,'5 x 5 x 2' inches
      Copper and tin, Red patina
      © 2000 Nayna Shriyan
      raising bowls and other similar vessels using special stakes( tools) and hammers. A very delicate process, that can easily go wrong if you do not know what you are doing! There are absolutely no joints in the vessel, my first raised bowl featured here received some intense scrutiny by my non-metalworking friends for some joint somewhere, it was so much fun to look at their faces when they finally conceded defeat still insisting that there had to be a joint somewhere !
    • Fold Forming: A very interesting process that involves folding the metal to create creases and them opening it again. The crease adds to the visual and textural effect.A process that I am still trying to perfect and my final efforts will soon be feature here ! Keep checking back :)

    Sunday, December 19, 2010

    Getting Boxed in !!

    Recently a friend of mine wanted a special container to send a gift across, she had some specific dimensions in mind and I suggested an etched copper box made specifically for her requirements.She had seen some previous etched work and was quite excited about the matte effect created while the acid etching is taking place, so she agreed. While she was going to be creating the graphics for the same I was working on the metal work part of the project.
    Design ideas for the box © Bhavana Sadhwani
    She came up with quite a few designs, quite intricate, the final one that was chosen for its aesthetic value as well as for ease of etching.

    The very first thing we did was to go hunting for suitable sheet of metal, this of course had to be copper, while we could have chosen brass, there is just something so irresistible about a sheet of copper with the warm reddish colour that we simply had to go with it.

    We bought a sheet that was 20 gauge in thickness and cut it to the required size of 15 x 3 inches ( 4 panels ) for the sides of the boxes and 2 x 3.2 inches(4 panels) for the sides of the lid and one piece of 3.2  x 3.2 and 3 x 3 inches each.

    The next step was transferring the design and applying the acid resist on to the positive areas of the design, leaving the negative areas to be etched by the acid.
    After having protected the sides and the back of the panels, it was time for the acid to do its work.
    Basically the reaction that happens is that the acid combines with the surface copper ( exposed area) to create copper nitrate,  turning the acid blue and releases hydrogen gas in the form of small bubbles that form on the surface of the copper piece.
    © Pigeons of Vrindavan society


    Here is the fun part of the process, I get to keep moving those bubbles away with the help of a crow's feather ( a pigeon feather works just as great !)

    Once the panels of the box had been etched to a satisfactory level, it was time to solder them together 

    ©Nayna Shriyan Copper, acid etched.
     Once all the sides had been joined, the lid assembled, the need for a small ring to pull the lid out with ease became evident. Once this was added, the box was cleaned and buffed and voila! we had ourselves a pretty good gift box!

    Tuesday, September 21, 2010


    © 2010 Nayna Shriyan, copper , vitreous enamel
    Copper bowls with crackle medium, not sure whether the crackle effect has come out like its supposed to but, I sure am loving it !! I think I may have over fired them, but would like to keep continuing to experiment.
    © 2010 Nayna Shriyan copper, vitreous enamel

    Sunday, September 19, 2010

    © 2010 Nayna Shriyan  copper bowl, copper wire, and vitreous enamel  5"' x 5" x 1"
    A while back I had written about wanting to work with the gulmohar flower as my inspiration, ( 'The art of the gulmohar flower' ) I have to confess  I have not posted my work with regards to the subject regulary :( but  I intend to change that by posting my first effort, an enameled bowl.
    I kept this one simple by using mostly transparent enamels, layered to create the cool green leaves against the fiery orange red flowers, surrounded by the bright blue summer sky.

    The copper wires really kept me on my toes, always threatening to fall off inside the kiln, but fortunately except for one or two mishaps I manged to get them to stay put !!